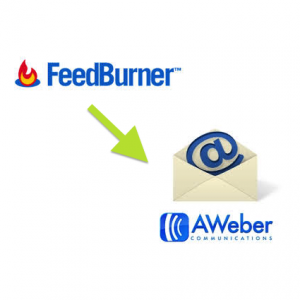
If you’re looking to migrate your Feedburner email subscribers to Aweber, it’s not as complicated as it might seem. I’m not the most tech savvy blogger out there, so I know how stressful and overwhelming this type of technical stuff can feel. The good news is moving your subscribers over to Aweber isn’t hard when you break it down into steps, which I’ll go over here with helpful screenshots. If you’re wondering why Aweber, check out these fantastic Aweber benefits.
Step By Step Instructions To Move Feedburner Email Subscribers To Aweber
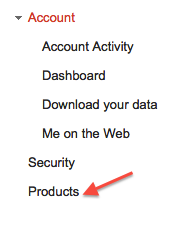
Step 1: Identify which email/password is linked to your Google Feedburner account. Hopefully you already know this. If you’re not sure, login to Google with each of your usernames/passwords, go to your Account page, and select Products.
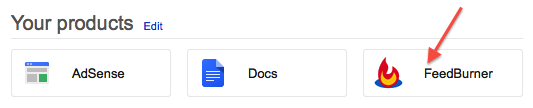
Then you should see Feedburner as one of the choices. Click on it.
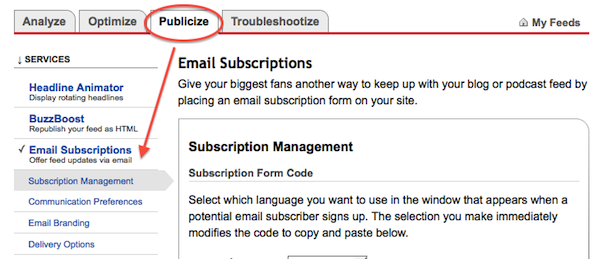
Step 2: Once you are in your Feedburner account, click on the Publicize tab. Select Email Subscriptions, and then Subscription Management.
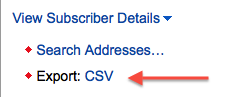
Step 3: Scroll all the way down the page until you see View Subscriber Details. Click on it to expand.

Step 4: Review your list of subscribers. You will see their email address, the date they signed up, and their current status. I suggest you manually clean up your list at this stage and remove any old subscribers who never confirmed, as well as any subscribers that have had multiple failed deliveries. Use the buttons in the Action column to make changes. Be careful however not to accidentally delete active subscribers.

Step 5: Now that you’ve finished reviewing and making updates, you’re ready to export your list of email subscribers. Click on the Export: CSV link and the file will be downloaded to your computer.
Step 6: Next, login to your Aweber account. Create a new list for your RSS email subscribers and also setup a Blog Broadcast for that list which will automatically (or manually if you prefer) send out your RSS feed over email. For detailed instructions on how to do that, please see this post: How To Setup RSS Email Delivery For Your Blog With Aweber.
This part of the process was quite confusing for me until I really sat down and thought about all the moving pieces. Remember you can use Aweber to create as many lists as you want for all different purposes, even for multiple websites! Each website can have multiple newsletters sent to different groups of people. For example you could choose to have 1 list for announcements, a 2nd list for giveaways, and a 3rd list for industry news, but of course those could easily be encompassed into 1 list on 1 newsletter too. You choose how you want to disseminate information to your subscribers.
It’s important to remember each list on Aweber is intended for a different purpose and group of people. It’s ok if it so happens that each list has all the same subscribers IF you gave them the choice to subscribe to both lists (which Aweber will help you with). Why do the subscribers need to choose? Because of the CAN SPAM Act. People have the legal right to control what they subscribe/unsubscribe to. Aweber makes it easy for you to stay in compliance – As you’ll see below, if you try to import people into a new list, Aweber requires those users to confirm they want to subscribe to your new list before they can receive any messages from you.
A nice perk with Aweber is if a user is subscribed to multiple lists with the same email address, Aweber automatically gives them the option to choose which list(s) they want to unsubscribe to if that time comes.
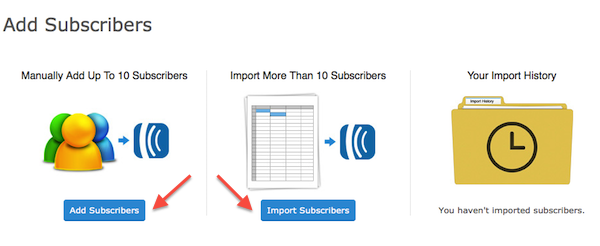
Step 7: Once your new list is created, select it within your Aweber account, then click on the Add Subscribers link on the Subscribers tab.

Next, click on the green Add Subscribers button.

Step 8: Open the CSV file on your computer that you exported out of Feedburner. I suggest clicking on the Import More Than 10 Subscribers link unless you only have a couple email addresses to upload.
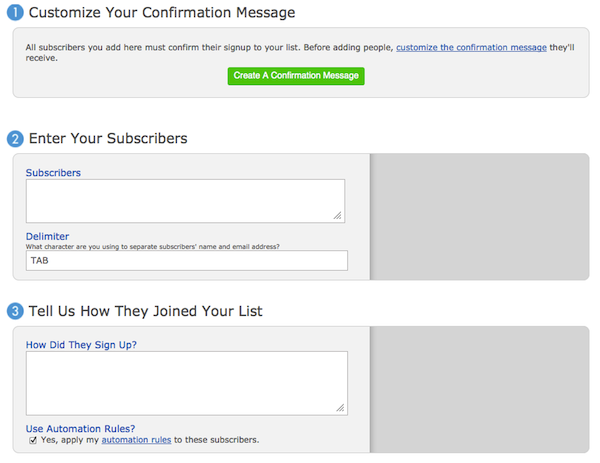
Step 9: You should have already created your confirmation message in Step 6, so you can go straight to box #2 Enter Your Subscribers (see below screenshot). Copy the emails from your CSV file and paste them into the Subscribers box. (If you do click on #1, you’ll need to repeat Steps 7 & 8 above after you make changes to your confirmation message.)
Next, you need to briefly explain to Aweber why you are importing subscribers in box #3. Since Aweber is dedicated to fighting spam and violators of the CAN SPAM Act, they review and approve/reject all uploads. Don’t worry, this isn’t anything to be nervous or anxious about. Aweber typically reviews and releases import requests in 1 business day or less. You can simply write “I am disabling my Feedburner RSS email delivery and am migrating my subscribers into Aweber.”
Note on email confirmations: Aweber’s standard policy is that each subscriber you import will have to confirm they wish to continue their subscription with you. While you may find this annoying, it’s actually a good thing because it prevents spammers from importing stolen addresses, keeps subscribers happy, complies with the CAN SPAM Act, and keeps Aweber’s delivery rate really high.
You will likely lose some subscribers who choose not to reconfirm in this process, but chances are you would have lost them anyway. And you will keep your most interested subscribers, who are the most important, and you’ll continue to gain new subscribers over time. You can also publish an announcement on your blog giving existing subscribers a heads up you are changing service providers and they will need to reconfirm in order to continue receiving updates.
If you really want to avoid the reconfirmation process all together, open a ticket and ask if Aweber can upload your list for you to avoid the users having to reconfirm. But this requires Aweber to gain access to your Feedburner (and Google) account however, to check you already have permission to send RSS email updates to those users. I didn’t want to give them access or have to bother changing my password afterwards, so I found it easiest and fastest to upload the emails myself and just let people reconfirm.
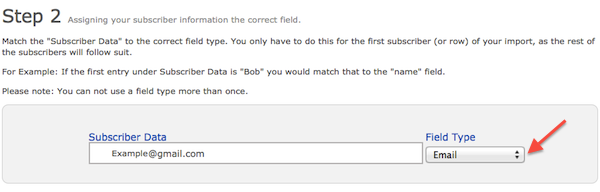
Step 10: Next, double check Aweber has correctly identified what type of information you uploaded. If you only pasted in email addresses, select “Email” in the Field Type. If you pasted in additional data such as a user’s First Name and Last Name, update the Field Type for each accordingly.
Step 11: When you’re done, you can go to the Manage Subscribers page to view everything you uploaded. You should see “Confirmation pending” in the Status field of the emails you just uploaded. You can check back here periodically over the next several days to see how the confirmation progress is going. Once Aweber has released your upload list and the confirmation message has been sent to your uploaded list of subscribers, you may want to modify your confirmation message if you included a note about switching vendors since that’s irrelevant to brand new subscribers who sign up for this list.

![]()
Step 12: Lastly, you need to go back to your Feedburner account, and at the bottom of the Publicize tab/Email Subscriptions/Subscription Management page you will see the option to Deactivate email subscribers. Click Deactivate and you’re done!

Once people start to confirm their subscription with Aweber, in your Feedburner account go to Analyze – Feedstats – Subscribers, and you will see “Aweber.com Blog Broadcaster” along with the number of active subscribers.
START A MONEY MAKING BLOG
It’s been around six years since I started Financial Samurai and Yakezie and I’m actually earning a good passive and active income stream online now. The online income stream has allowed me to pursue other more interesting things, such as consulting for various financial tech startups, traveling around the world, and spending more time with family.
I never thought I’d be able to quit my job in 2012 just three years after starting Financial Samurai. But by starting one financial crisis day in 2009, Financial Samurai actually makes more than my entire passive income total that took 15 years to build. If you enjoy writing, creating, connecting with people online, and enjoying more freedom, see how you can set up a WordPress blog in 15 minutes with Bluehost. You never know where the journey will take you in 2015 and beyond!
Regards,
Sam


Your two-part series is very well done! A lot of people will be using these posts as a resource. I had been planning to do this for months with my blogs, so your article will give me the push I need to get on this… especially when I relaunch the DN.
I agree with your use of AWeber to deliver RSS via the blog broadcasts for several reasons, the best of which is great stats and flexibility etc.
Another option is using JetPack via Automattica (WordPress). This is a free option and I know quite a few bloggers who successfully use it. Although it doesn’t appeal to me, it’s actually quite simple for a newbie blogger compared to AWeber.
Cheers
Avrom
Thanks! I do hope people will find them helpful. I love step by step guides for technical stuff with screenshots, so I applied that here to help make things as easy to understand as possible. I was confused about everything that was going on earlier this year until I realized I was overcomplicating everything in my head. Once I started doing some research and made a checklist of all the steps involved, everything made sense.
Wow, thank you for all of this detailed information, the screen shots, the links and step-by-step instructions. I, too, have been planning to move away from Feedburner and now I know how to do it! Thanks so much for a truly helpful post.
You’re very welcome! If you have any questions do let me know. I had fun putting these Aweber posts together and it makes me wish I knew even more technical stuff to write other step by step guides for!
I personally don’t use Aweber (I use GetResponse). Nevertheless you wrote an excellent in-depth step-by-step tutorial.
[…] disable the email delivery and sign up functionality on Feedburner. Read my step by step guide on How To Migrate Feedburner Email Subscribers To Aweber for instructions. Step 10: You can also create a page on your blog dedicated to subscription […]
[…] things I’ve learned from blogging since I started Untemplater. Some I learned from others, some I learned by research, and a few I learned by accident. If I had to pick only one piece of advice to share from them all, […]